Power BI – DAX If Statements
By: David Rohlfs
Introduction
Getting into Microsoft Power BI can be a little daunting at times. There are coding languages, data models, custom fields, and so much more. But the best way to take on the learning process is by learning the basics then graduating to the complexities. One of the basics is writing an If statement in DAX. If statements are extremely useful because they allow you to filter and give a result.
As of writing this blog, there are a lot of preview options that are affecting the modeling page. If you find that I am using some processes that you do not have access to or do not see on your report building page, I suggest reading through EPM Strategy’s blog on Preview Features linked below.
In this blog we are going to go over when to use an if statement in DAX and a short walkthrough demonstrating how you build an if statement in DAX.
When to use it
If statements are very useful in a multitude of situations. They come in handy when you want to build a simple slicer, create a filter for a table, return a value according to a different field, and a lot more.
The syntax for a DAX if statement is very simple. The syntax is:
IF ( <LogicalTest>, <ResultIfTrue> [, <ResultIfFalse>] )
One thing to take into consideration is that you will probably be placing this if statement inside of another equation or inside of a variable. And if you are doing this, you should be very conscientious about what is going to happen in the future to your data. Although a DAX equation works now, you need to keep in mind that there are going to be errors in your data at some point. And because of this I never advise on skipping the else result. The else result is there to give your data an option to be wrong.
Nesting If Statements is a common and useful application for any measure or calculated column. To do this you just place an if statement inside of another if statements then or else response. An example of this is in an image below:
![]()
Walkthrough
In this walkthrough we are going to go through an example of creating a DAX if statement and using it inside of a slicer on a table. This is an easy and common application of what an if statement can be used for.
To start, we are going to click on the modeling ribbon and select new measure.

Now we can write our if statement. Following the syntax stated in the When to Use it portion of the blog, this is my equation.
![]()
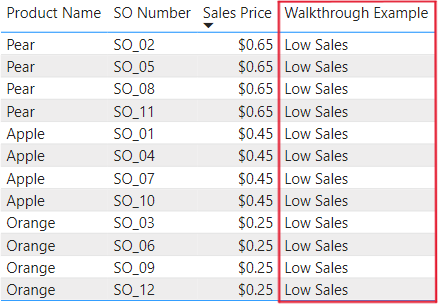
Here is what happens when I place this measure inside of a table with some other data from my query.
Conclusion
Using if statements is one of the first things that you should learn when beginning to work with DAX. They are extremely useful in creating filters, variables, or just to kick out a result. If you do not feel entirely comfortable with the process of creating if statements in DAX yet, I suggest reading through some of the blogs linked below. There are some that give the basics of DAX, and some that give alternative solutions to using DAX.
Links to Related Articles:
Understanding the Basics of Using Variables in DAX
Comments
2 Responses to “ Power BI – DAX If Statements ”
[…] DAX If Statements […]
[…] DAX If Statements […]
Leave a Reply
You must be logged in to post a comment.