Power BI: Append and Merge
BY: David Rohlfs
Introduction
There are some areas in Microsoft Power BI that have a lot of redundancies. Meaning that there are many ways that a report builder can accomplish the same goal without using the same process or function. The way that we will be focusing on in this blog is how you can Append and Merge data.
In this blog specifically, we will only be going over the basic append and merge that is in power query. This is just to keep this blog concise and clear, but there will be a couple of other blogs that cover this same topic with links below. Those blogs will be over the DAX Join() functions, and the DAX Union() function. I would urge you to go ahead and read through those blogs along with this one to get a larger knowledge base of how to append and merge data.
In this blog we will cover when to use the append and merge functions, some common problems that you may encounter while using these functions and go through a walkthrough of how to access and use these functions.
When to use it
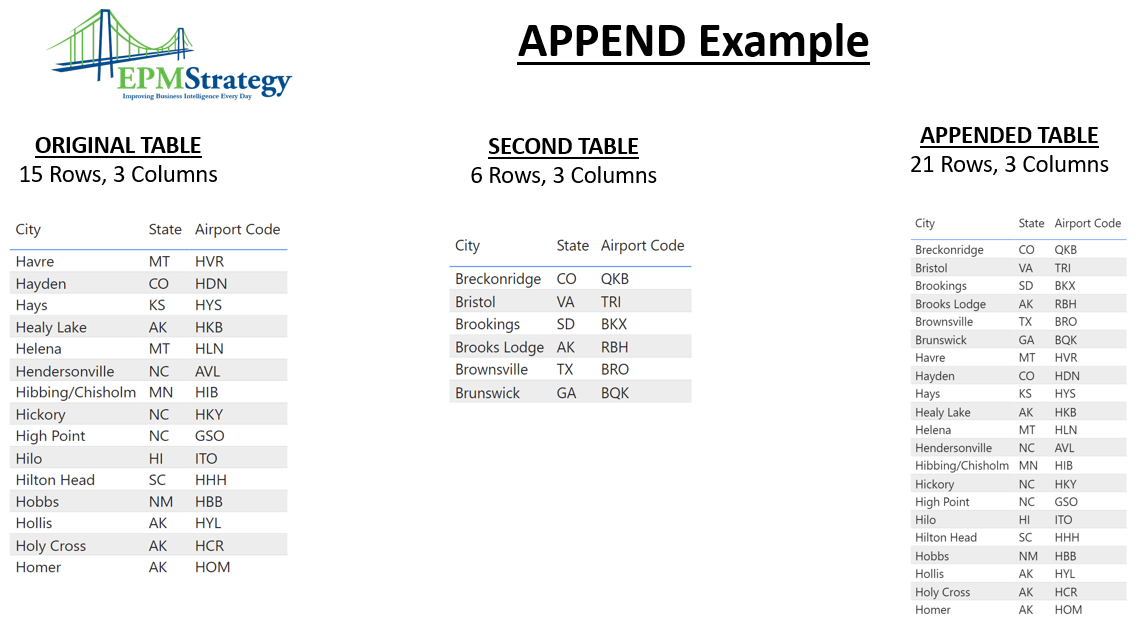
While the append and merge functions are two separate and independent functions, they have many similarities. Normally you would associate a merge with being horizontal and adding new columns to a query, while an append is used to add new rows. To better illustrate this here is a visual about showing some of the basics:

For both functions, the terms and actions will be in the Power Query. Doing these functions in Power Query will allow you to make the changes you need before going and building your report.
Because we are going over two different functions in this blog, I am going to split some of this section up so that you can better navigate it. I am also adding information into rules so that you can pick and choose the information you want to read through without spending time of stuff you may already know.
Rules for How to Use a Merge
Rule 1: Merge as Soon as Possible
One of the challenges with a merge is that you will want to do it as soon as possible in your applied steps. This is especially true because the goal is to add more columns in your query. If you did go through and get an entire query ready for reporting, then decided that you would merge after that you could easily be doubling the amount of performance that you need to refresh your data.
Rule 2: You Need Row Specific Columns
Because we are taking two tables that start separate from each other, we need a way to join the two together. When using the merge function, one of the steps is creating a temporary relationship that aligns two columns to each other. In order to do this, we will need to join the tables according to some sort of index or row specific column.
For Example: In the image below, you see that we have two different tables that we need to put together with a merge. In Table A, we have the ID column that is in chronological order and has the supplementary columns attached to it. In Table B, we have the ID column that is not in chronological order, and the supplementary columns are also out of order because of it. Now, if we just took the two tables and mashed them together, we would get rows that have two different ID’s instead of having a consistent ID. What the merge function needs is two columns that can relate and automatically align the two tables so that each ID is consistent within the same row. Thus, fixing any sorting errors that may have happened before you decide to merge your queries together.

Rule 3: How to Choose to Merge or Merge as New
When you start going through the process to merge a query, you will be faced early on with a decision of whether to merge your queries together as is, or to merge the queries together in a new query. For the most part this won’t be a big decision for many report builders, but if you are inexperienced with merging queries then you may want to review some aspects of each decision.
Merging as a new query: This may seem like a great decision at first. You get to keep your original queries as is and as a backup to use in the future, but what you may be doing is killing your performance. When you choose this option, you are not going to reference the original query anymore with your new query. Which means that every time you hit the refresh button you will be refreshing the original tables entirely as well as the new tables, so you will be refreshing four times instead of two. If you are only working with a small semantic model this won’t be a big deal, but if you get into bad habits while it’s easy, then you may start killing your performance later and not realize it.
Note: This only applies if you are not using the original tables in the report. If you are using the original tables as a different piece, then you may want to keep them loading and refreshing.
If you want to fix this issue, then you will need to disable refreshing and loading into your report. Doing this to your original tables will ensure that you are not wasting time waiting for tables that you don’t need to refresh. To do this you can just right click the table name in Power Query and uncheck “Include in report refresh”, then uncheck “Enable Load” (you will need to do it in this order specifically).
Merge Query (Existing): If you choose to merge a query and not to merge as new, then you will be taking the first query and attaching the second query to it without any new tables. In most cases this is what you will want to do. Some of the biggest pros are:
- It allows for fewer tables.
- It helps performance speed compared to merging as new.
- You will only have one table to pull from in the report view.
The only thing that you need to keep in mind when you choose this option is that you will want to uncheck the Enable Load for your secondary table (the table that you are attaching to the first table). This will ensure that you have fewer tables loading into your fields pane while in the report view.
Rules for how to use an Append:
Rule 1: Your Columns Need the Same Name
When thinking about this it makes a lot of sense that your columns would need to have the same name. You are taking a table that has no connection to another table and placing them together. Do know that your columns do not need to be in the same order. Technically because we are in a query and not a table, the order of the columns does not matter. In fact, if you choose to change the order of your columns before you append, you may be adding a lot of performance stress to your report.
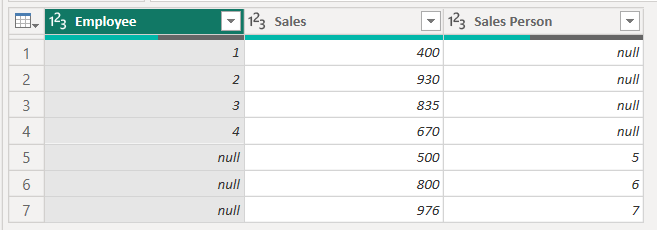
Note: If you have extra columns on one table or differing column names between your tables your append will still work. You will just see a lot of blank rows (null) on the columns for the table that does not have that data filled.
Rule 2: Append as Soon as Possible.
Just like the merge, you want to append your queries together as soon as you can because you want to minimize the amount of work you need to do and minimize the performance stress. When you choose to append as your second step (after source) you are allowing your applied steps to reduce the number of times it needs to change a type or filter a column. There are some exceptions to this like if your two tables don’t match well before the merge, but you should try to append your queries as soon as possible to receive as many benefits as you can from performance.
Rule 3: Append as New or Existing?
This is the same concept as the merge rule three, but it is still true for appending. Whether you want to append a query as new or existing mostly depends on if you need the original queries to stay as originals for building your report or not. If you are simply going to get rid of the original tables, then you may want to improve your performance by selecting to use the append in an existing table. To know more about this read merge rule three.
Common Problems
The main problem that you will face when working with appending or merging is the name of the columns. When you are choosing to merge, your goal is to have different names for each column. When you are choosing to append, your goal is to have the same name for each column.
For most of the problems that you face when working with appending and merging it will be a case-by-case solution. Because you are taking data that is not originally together, there may be a lot of differences between the two queries. But that is part of the beauty behind building reports. There are a lot of challenges that you face that you just need to problem solve and may be specific to your situation. If you ever have a problem that you really can’t figure out it may be wise to talk to a professional consultant or go to the Power BI Community Forum to ask for help.
Walkthrough
In order to keep this walkthrough as simple as possible, I am not going to go too far into depth with either a merge or append. In order to get the best representation that EPM Strategy has about what each function does, I would suggest reviewing the first couple of images in the “When to Use It” portion of the blog and searching what Microsoft has published on the two functions.
For Merge:
To start you are going to need to go to Power Query. Note: If you are not able to use Power Query for whatever reason, try reading the other EPM Strategy blogs on the DAX Join Functions and DAX Union function.

Now you can select the first query that you want. Note: The query that you select here should be meant as the query that you want on the left side of the column order. You can manually change the order of the columns later if you want to, but that may be adding some performance stress that you can easily fix early on.
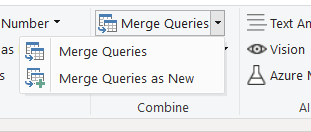
Then under the Home tab in the top ribbon, on the right side you should see a merge option under “Combine”. Hit the drop down and either select the Merge Queries (Existing) or Merge Queries as New. To see some of the pros and cons of each of these you can look at rule three for merging above in the “When to Use It” portion of the blog.
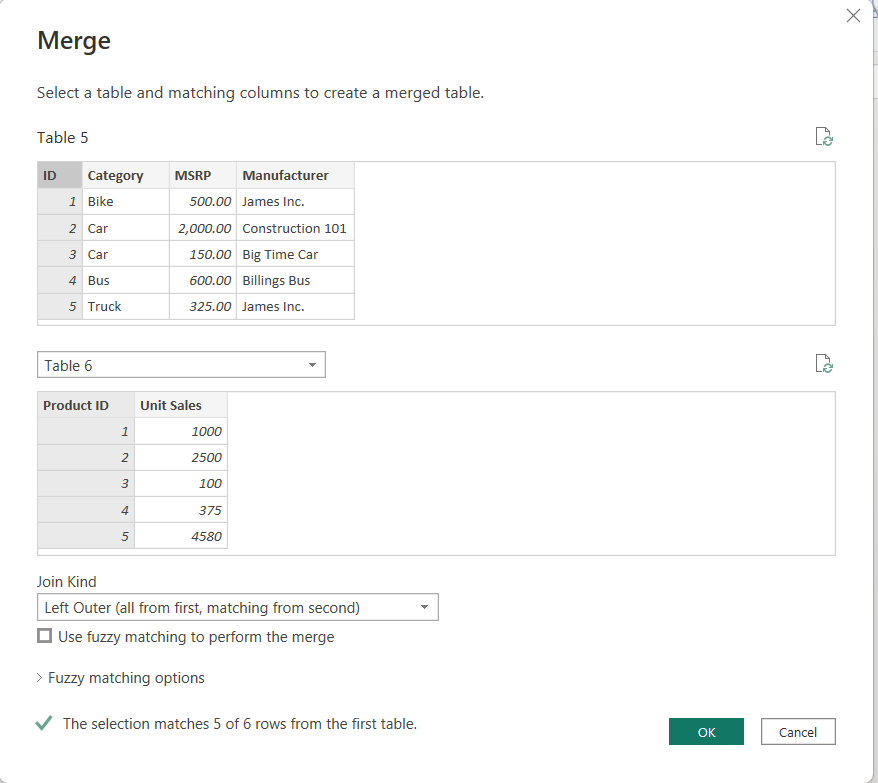
Once you are inside of the pop-out, you will see a space to choose your second table. Go ahead and hit the drop down and select the table that you are wanting to merge to.
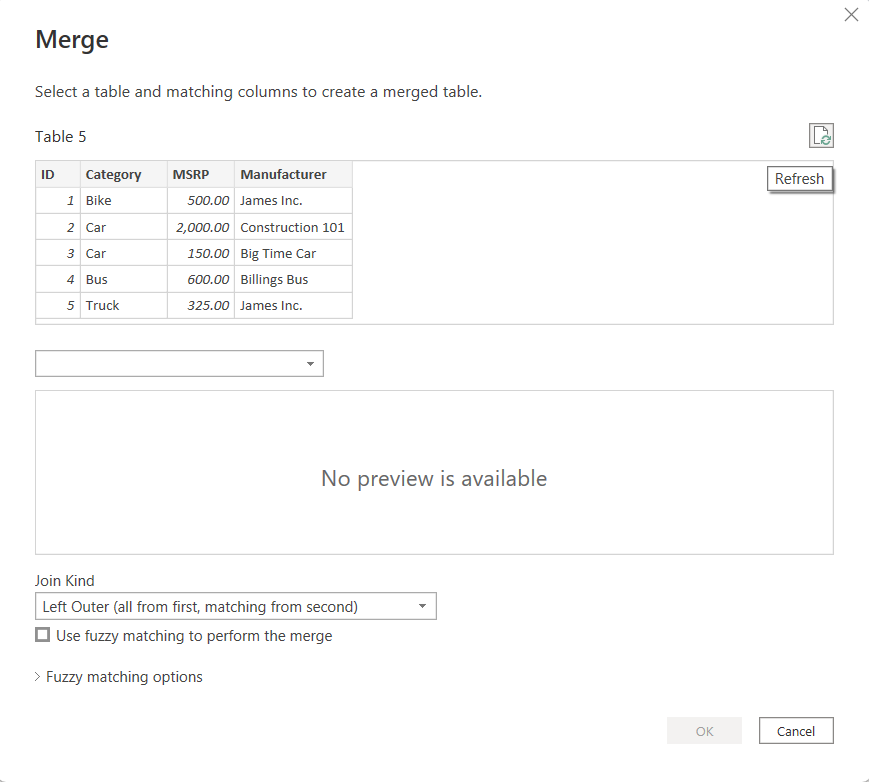
Now we are going to go through a couple of the final options that you have for merging. The first is that you will need to choose your Row Specific Column to create your merge. Next, you will want to review your “Join Kind”. Normally, you will want a Left Outer join. This is the standard merging technique. Before you click OK, I would suggest looking through the options under this dropdown to make sure that you are not removing important rows or creating redundancies in your data. You likely won’t want to use the Fuzzy Matching Options because they can easily mess up some of your data, but if you do need to use this option, I would suggest researching it for a while. Once you are done selecting your options, you can go ahead and click OK.
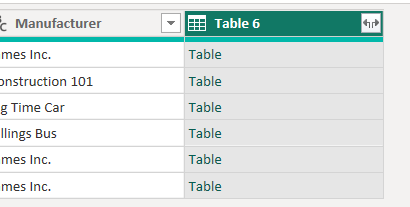
Next, you will be sent back to the query page and see that your original table has the name of the query you merged, and data contents named “Table” in each of the rows. To see the data that you want, you can just hit the outward facing arrows in the top right of the column, then select the columns you want. After that just hit the OK button in the bottom corner and you should see your data pop up from the table you merged.
Now you should be sent back to the query and see the merge happen. This is a good point to start verifying your data. I suggest checking that you have all the rows you want, all the columns you need, and that all your column names and data types are correct. Not doing this now could lead to some discrepancies in your data that you may not catch until later from now.

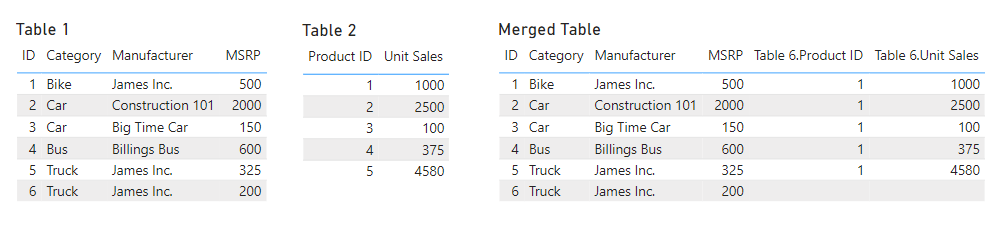
Just to give a view of what is happening in a merge here is another image:
For Append:
To start you are going to need to go to Power Query. Note: If you are not able to use Power Query for whatever reason, try reading the other EPM Strategy blogs on the DAX Join Functions and DAX Union function.
Next, go ahead and select the first table that you want to use. Note: This table will show up first in your append, so I would suggest taking into consideration the order that you may want your rows in. This is entirely changeable, but it may save you some time messing around with the row sorting later.
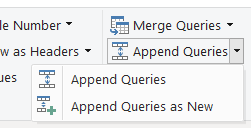
Now we can go ahead and click the Append Queries dropdown in the top right corner under the Home tab ribbon and under Combine. In this you can choose to either Append Queries (Exiting) or Append as new. To learn more about some of the pros and cons for this option, I suggest reading through Rule Three for “When to Use It”.
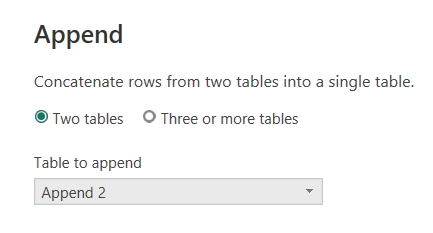
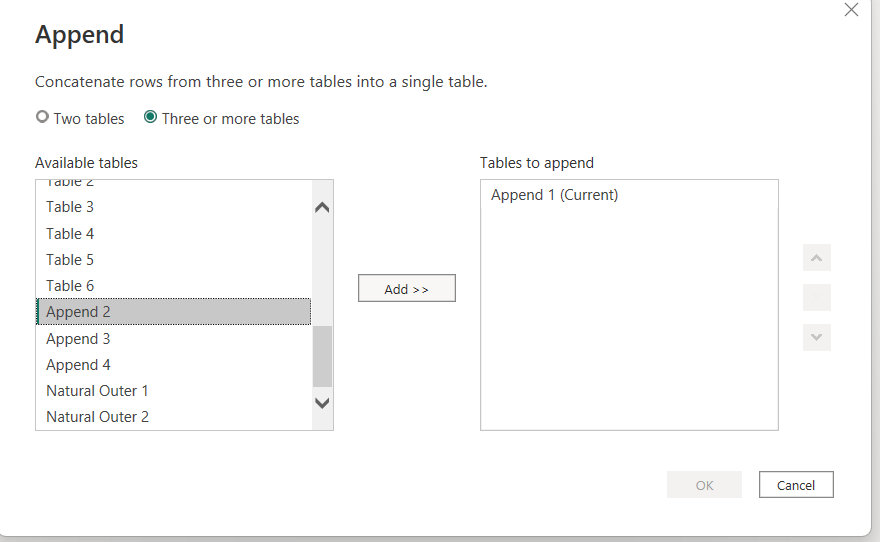
Once you do this you should see a pop out appear titled Append. In this you can choose to have only two tables appending or three or more tables. For only two tables, you just click the dropdown and select the table. If you are using the three or more tables option, then you will need to select the table and click the Add button in the middle. Note: You may want to focus on the order that you add the tables in because this will be the order that they appear in the query view.
Once you do that you can click the OK button in the bottom right of the pop out.
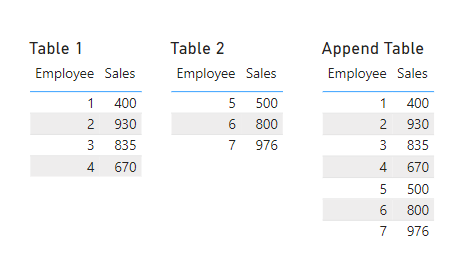
To give a better view of what is happening with the append, here is an image that illustrates the transformations.
Conclusion
This blog may be a lot of information to digest after one read if you have never had any immersion into merging or appending. But this blog is only meant to go over some of the most common situations that you may encounter while dealing with appending and merging. There are more ways to append and merge data by not using either of these commands, but instead using DAX. To learn more about these methods you should go and read EPM Strategy’s blog over the Join DAX Function and the Union DAX Function.
Power BI Row Specific Columns : :: Welcome To EPM Strategy ::
Comments
4 Responses to “ Power BI: Append and Merge ”
[…] Link to “Append vs. Merge” […]
[…] Link to Append and Merge Blog […]
[…] Merge and Append […]
[…] Append and Merge […]
Leave a Reply
You must be logged in to post a comment.