Power BI – Reference a Previous Row in Power Query
By: David Rohlfs
Introduction
One of the difficulties in Power BI is that the data tables are seen as individual rows and not necessarily rows in a specific order. If you have noticed this then you probably have come across a similar issue that this blog is aimed at solving. A common problem that this creates is when you need to reference a row in the data table that is not your current row. This blog will aim to reference a previous row using Power Query.
Note: This blog is not meant to reference a row that cannot be sorted to be immediately previous or after the current row.
We will be using a few basic concepts together to solve this problem. I have written several other blogs that explain these basics and they will be linked at the end of the post. If you see something that you are not familiar with, I suggest looking into the linked blog.
In this blog we will go over why and when you might want to reference a previous row, some problems that you might find, and a walkthrough demonstrating how to reference a previous row.
When to use it
There are a lot of more nuanced reasons why you would want to look at another row, but the general reason is that you need to do calculations in Power Query before you apply your steps. The reason that I came across this problem was that I needed to see if the current value of Column A was higher than the next value of Column A.
This method is not necessarily the best for you. One of the problems with it is that you can get the same result in DAX with a much more simplified process that will likely be a bit better for performance as well. I would suggest going that route unless you need to stay inside of Power Query.
Let’s talk about the process so that you can understand what is happening better in the walkthrough. We are essentially going to copy the same table and use an index to place rows against different rows. Here is a basic concept of how this works.
Common Problems
Sorting the column
Before you create the index, you need to make sure that your table is sorted the way that you want it to be. If you sort the table incorrectly then you may run into the problem of doing an index on a table that is not in the correct order. If you sort the table correctly and notice errors occur with how your table is indexed, you might want to add in a table buffer directly after the table sort.
Incorrect M Code
When working through this problem on my own I found another solution that avoids using a referenced table. This worked fine while I was in Power BI desktop, but once the data model was published there were refresh problems. I would avoid using this M Code but will still show you it in case it could help your specific situation.
#”Added Index” = Table.AddIndexColumn(#”Previous Step”, “Index”, 0, 1, Int64.Type),
#”PrevValue” = Table.AddColumn(#”Added Index”, “PreviousValue”, each if [Index] > 0 then #”Added Index”[MonthlyValueSum]{[Index] – 1} else null)
Walkthrough
In this walkthrough we are going to have only one table and we need to get the next rows data to the current row. This isn’t a super complex process, but I suggest following the process closely so that you get the correct rows referenced.
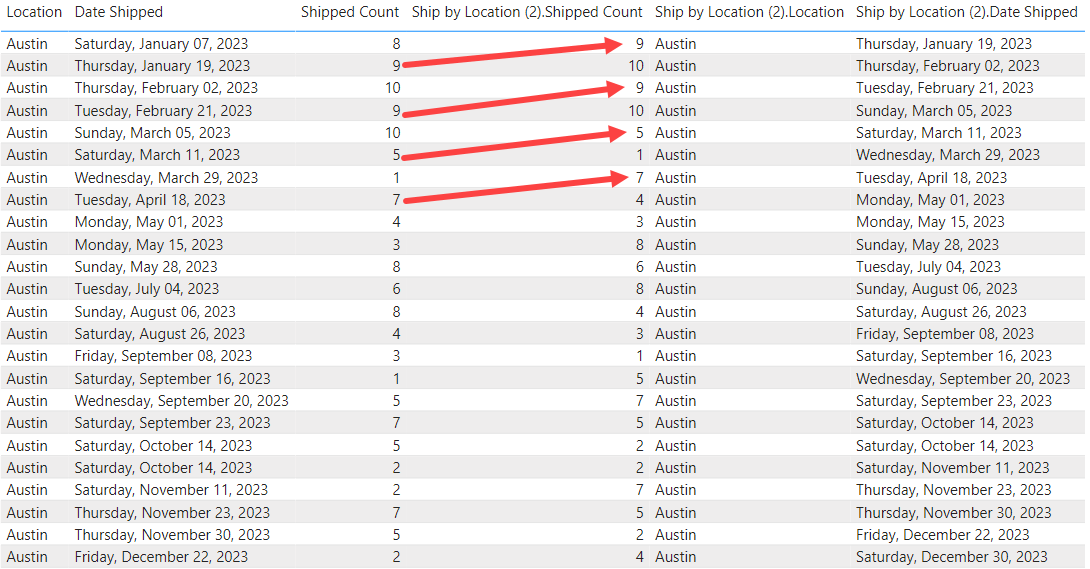
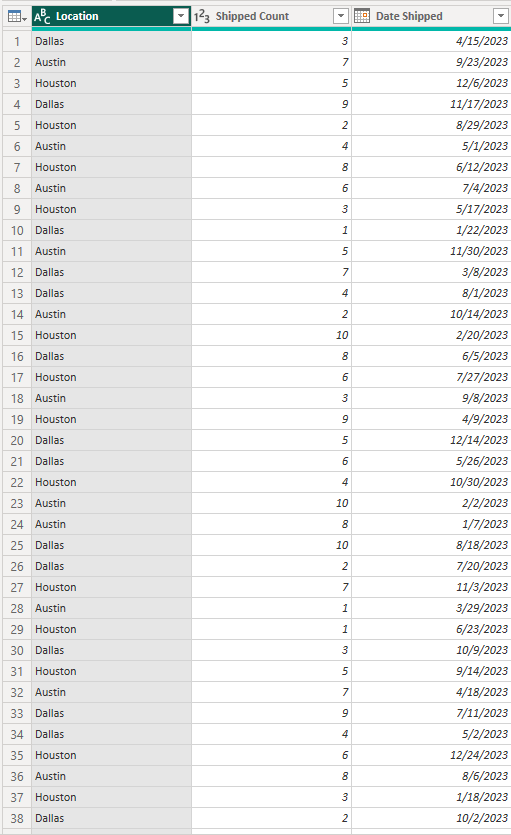
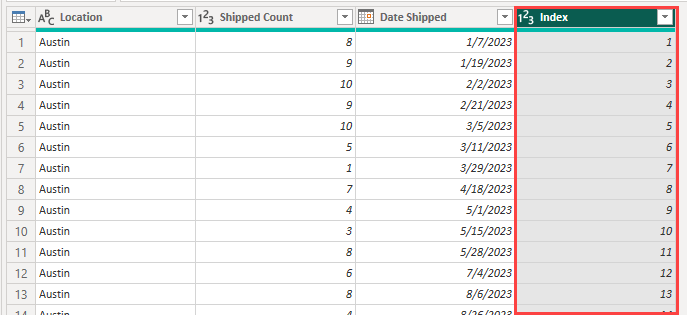
To start here is our table. Our goal will be to Get the next value shipped to a location so that we can see if our current value is greater or less than the next shipped amount.
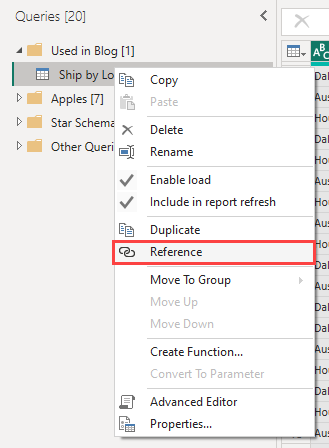
Assuming that we have taken whatever steps to get our table clean to this point, we are ready to get the next row of data. We need to start by referencing the current query. To do this you right click on the query name in the query list and click on reference.
Now go back to your original query and uncheck enable load. This should be just above the same spot we went to reference our query.
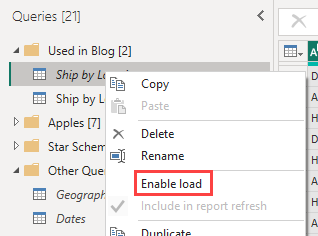
Now you can also uncheck enable load for your referenced query.
In order to make sure we get the row of data we want; you will probably want to do a sort. For my example I am going to sort ascending on my location and my date shipped columns on both queries (If you do a sort on your original query it will automatically apply to your referenced query). Here is the M Code that I am using.
![]()
Next, we can start to create our index on each table. Depending on how you want to adjust which row moves, you can adjust how you start your index. This method will get the next row of data onto the current row.
Note: If you want to get rows that are more than one apart you can adjust the starting number of your index by altering the M Code slightly. Learn more about this in the Index blog linked below.
On the original table we are going to go to the Add Column ribbon and find Index. Then we can click the dropdown and select From 1.
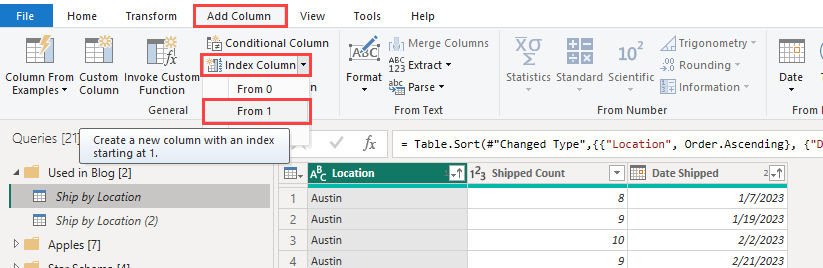
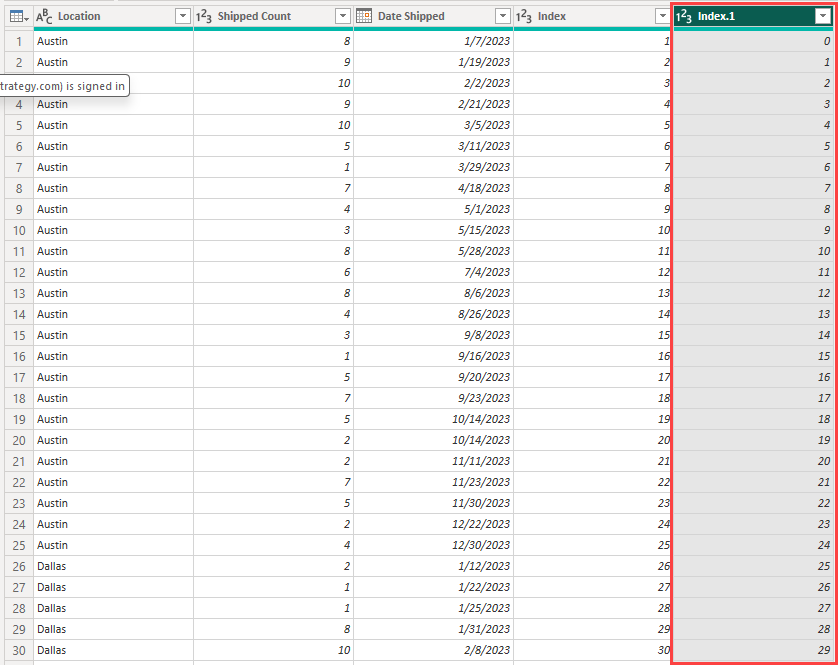
Now let’s do this same process on the referenced query but instead of selecting From 1, we will choose From 0.
From here we can go back to our original table and do a Merge. On the Home ribbon, go over to Merge Queries, select the dropdown, and select Merge Queries as New.

In the pop-out select the original table and the referenced table. Choose the index columns that we created to use as our Key Columns.
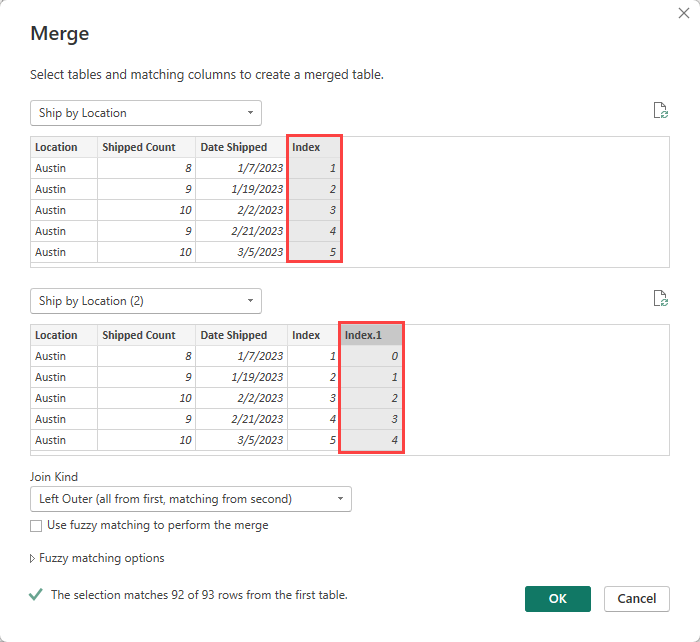
I suggest waiting for the number of matches to render and load in the pop-out. Because I am only moving one row away, you will notice that one match will not be made. This is expected and we will fix it. Once you check this click OK in the bottom right corner of the pop-out.
![]()
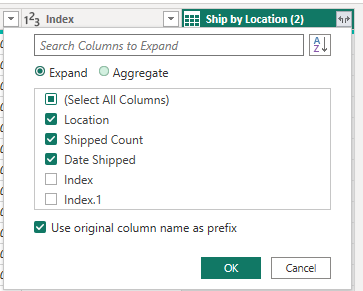
You should have a brand-new query that contains a column that is a table.

You can click on the expand icon and choose which columns you would like to get the next row of data for.
Because we had one row that wasn’t a match, we want to make sure that that row is valued as null, blank, or 0 (depending on your calculations and needs). If you want it to be a null you can leave it alone, but if you want it to be a 0 or blank you will need to do a replace values.
Note: The row that does not have a match is the very last row of the table.
![]()
Click on the column you want to replace the value in, go to the transform ribbon, and select the replace values function.
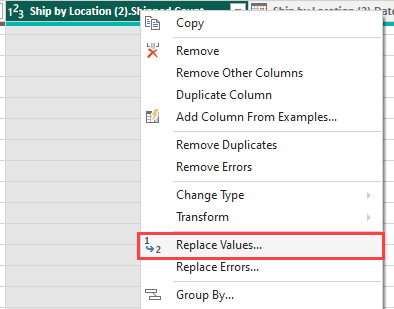
Type in null to the top value, and if you want blank, you do not need to place a value in the second box, but if you want 0 (which I do for this walkthrough) you can type in a 0 in the second box. Then click OK.

From here you should be ready to go onto your next steps.

Conclusion
I hope that this blog helps you work through a problem that you have. There are a lot of reasons to reference a different row in Power Query, but there hasn’t been a whole lot of solutions to this problem yet. If you enjoyed this blog I recommend looking into the linked blogs below.
Links Related to This Blog:
Comments
Leave a Reply
You must be logged in to post a comment.